Shiprocket integration
Shiprocket is an Indian service that allows users to connect with multiple carriers, like Delhivery, Blue Dart, DTDC, India Post, Xpressbees, and more. To manage Shiprocket shipments to clients directly within Odoo, it must first be configured.
To configure it, complete these steps:
Upon completion, it is possible to calculate shipping costs based on package size and weight, have the charges applied directly to a Shiprocket account, and automatically print Shiprocket tracking labels in Odoo.
Account setup
To begin, go to the Shiprocket website to create or log into the company’s Shiprocket account.
Follow the website’s steps to complete registration.
Create API user
On the Shiprocket Homepage, open the menu. In the Additional Settings section, navigate to the page.
On the API Users page, click the + Add New API User button. In the Add New User window, specify an Email ID. Open the Select Modules to Access menu and select Orders (create, update), Settings, Shipments, Listings, and Courier, then click Apply. Finally, click Create User to add the user.
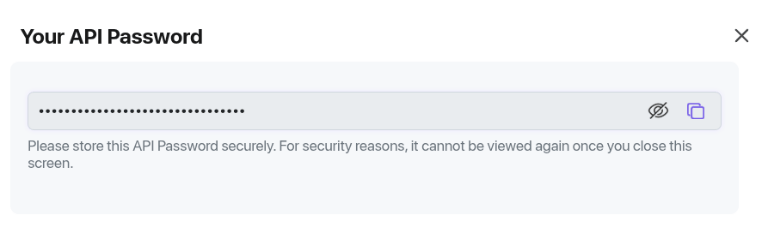
Copy the API password from the Your API Password window.
Create sales channel
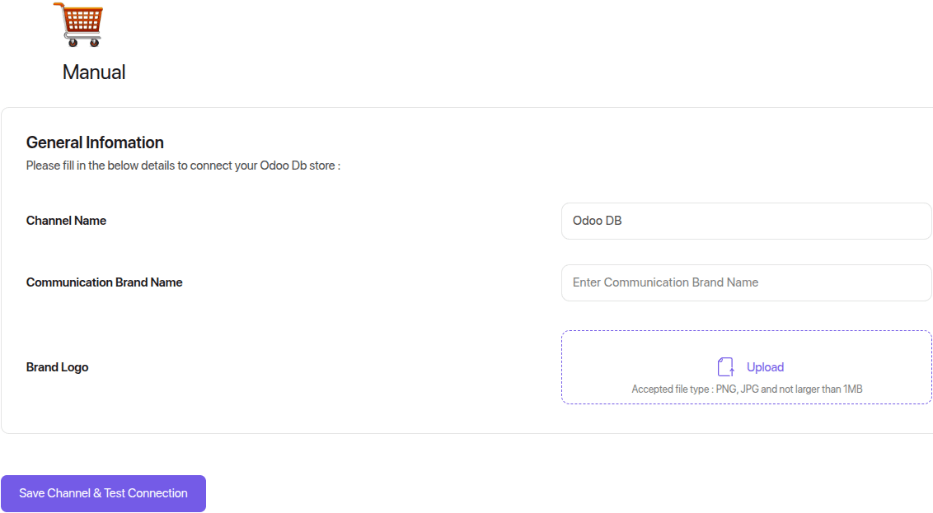
From the sidebar, navigate to . On the Sales Channels page, click Connect New Channel. In the Shopping Carts section, click the Add button under the Manual heading. The Manual settings page opens.
Specify a Channel Name, such as Odoo. Click Save Channel & Test
Connection.
Configure couriers
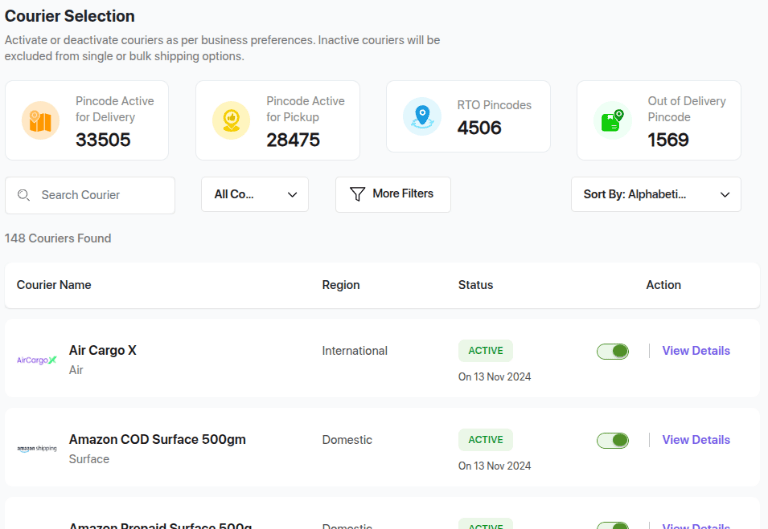
From the sidebar, navigate to . On the Courier Selection page, enable or disable shipping couriers.
Open the page. Set a priority ranking to which orders are assigned and click Save. The courier is selected in Odoo based on this priority. For example, if Cheapest is selected, the most cost-effective courier is selected.
Enable connector
The Shiprocket Connector must be enabled before a shipping method can be configured.
Navigate to . In the Shipping Connectors section, enable Shiprocket Connector, then click Save.
Configure delivery method
Configure the Shiprocket delivery method in Odoo by going to .
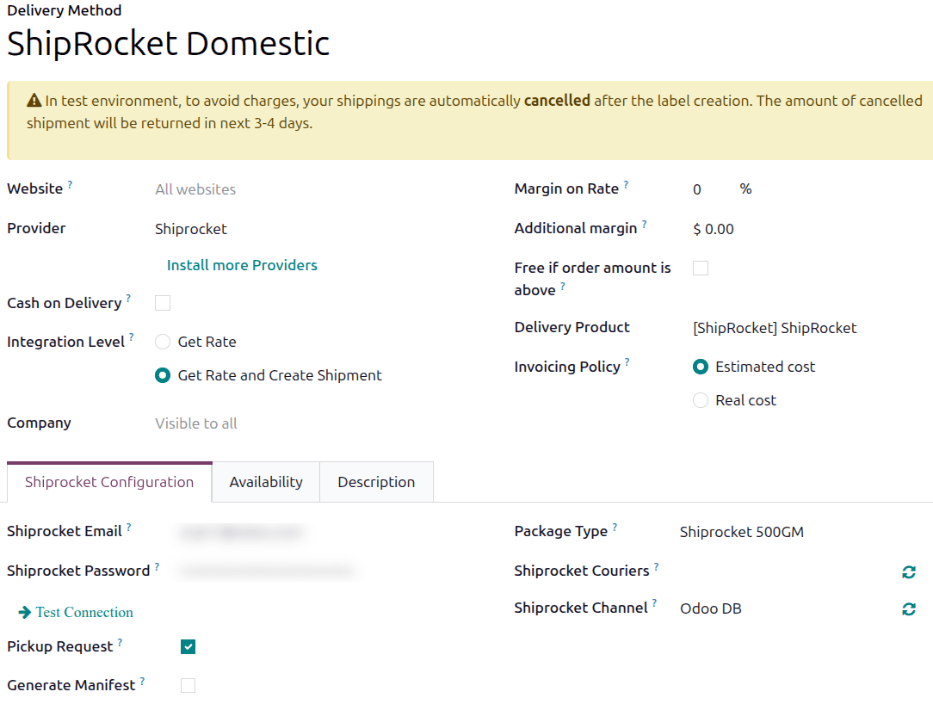
On the Delivery Methods page, open the ShipRocket Domestic shipping method, or click New.
In the Provider field, select Shiprocket from the list of providers. Doing so reveals the Shiprocket Configuration tab at the bottom of the form, where Shiprocket credentials are entered.
For details on configuring the other fields on the shipping method, such as Delivery Product, refer to the Add a new delivery method documentation.
Note
To generate Shiprocket shipping labels through Odoo, ensure the Integration Level option is set to Get Rate and Create Shipment.
Shiprocket Configuration tab
Enter the API user email address in the Shiprocket Email field. Enter the API password for the user in the Shiprocket Password field. Click the Test Connection link.
Select Pickup Request to send a pickup request when a delivery order is validated.
Select Generate Manifest to generate a shipping manifest and streamline the pickup process.
In the Package Type field, select a package dimension to use for shipments.
To retrieve the list of supported Shiprocket couriers, click the (Sync Couriers from Shiprocket) icon next to the Shiprocket Couriers field. Select the couriers to use in the Shiprocket Couriers field. If this field is left blank, Odoo will select the first courier based on the courier priority set in the Shiprocket portal.
To retrieve the list of Shiprocket channels, click the (Sync Channel from Shiprocket) icon next to the Shiprocket Channel field. In the Shiprocket Channel field, select the sales channel that was created in the Create sales channel step.
Availability tab
Use the Availability tab to specify the Countries to which the shipping method should apply. Shiprocket supports deliveries to over 220 countries.
Shipping information
To use Shiprocket to generate shipping labels, the following information must be filled out accurately and completely in Odoo:
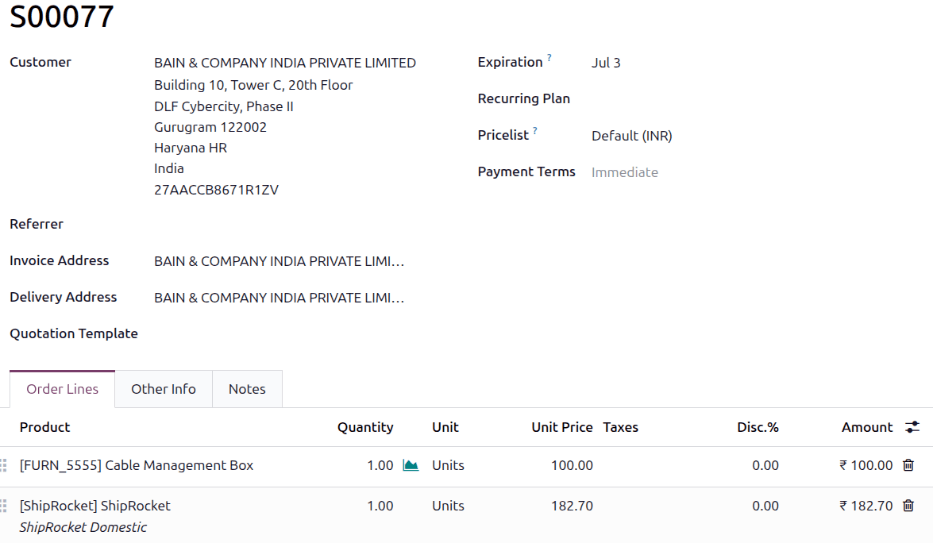
Customer information: When creating a quotation, ensure the selected Customer has a valid phone number, email address, and shipping address.
To verify, select the Customer field to open their contact page. Add their shipping address in the Contact field, along with their Mobile number and Email address.
Product weight: Ensure all products in a delivery order have a specified Weight in the Inventory tab of their product form. Refer to the Product weight documentation for detailed instructions.
Warehouse address: By default all packages are sent from the specified address in the warehouse. Make sure to set the Address in the warehouse form with a valid phone number and email address.
Generate a Shiprocket label
When creating a quotation in Odoo, add the Shiprocket shipping method by clicking the Add shipping button.
In the Add a shipping method pop-up window, select Shiprocket in the Shipping Method field. Calculate the shipping rate by clicking Get rate. Finally, click Add to include the shipping cost on the sales order line, labeled as the delivery product.
Note
Automatically calculate shipping costs for Shiprocket in both the Sales and eCommerce applications.
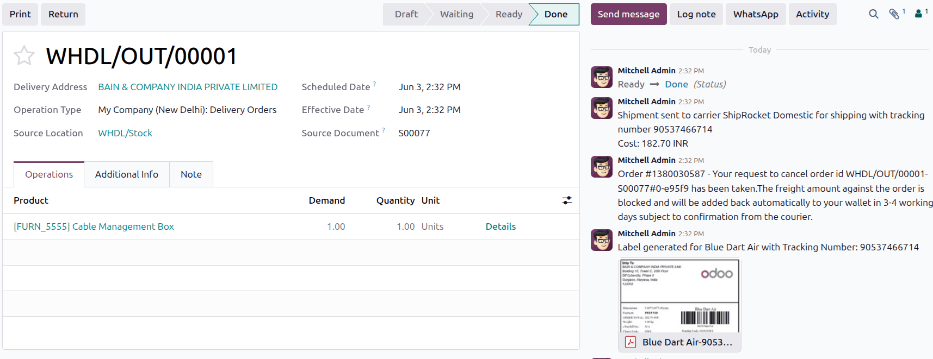
Then, Validate the delivery. Shipping label documents are automatically generated in the chatter, which includes the following:
Shipping labels, depending on the number of packages.
Tracking numbers, if the selected courier supports it.
Important
If the shipment is too heavy for the configured Shiprocket service, the weight is split to simulate multiple packages. Products must be put in different packages to validate the transfer and generate labels.
Cancellations
If a delivery order is canceled in Odoo, it is automatically archived in Shiprocket. However, the cancellation will not be sent to the courier directly, so make sure to log in to the courier’s platform to handle it manually.
Turn on Shiprocket integration
After the Shiprocket connection is set up, use the smart buttons at the top of the form to publish, turn on production mode, or activate debug logging.
Unpublished/Published: Click this smart button to make this shipping method available on the eCommerce website.
Test Environment/Production Environment: Click this smart button to specify whether labels are for testing only and are canceled immediately (Test), or whether real shipping labels can be generated and charged to the Shiprocket account (Production). In the Test environment, the amount of the canceled shipment is refunded in 3 to 4 days.
No Debug/Debug Requests: Click this smart button to specify whether API requests and responses are logged in Odoo (turn on developer mode and go to ).