Workflow
Odoo Point of Sale allows for the creation and configuration of a point of sale as well as the management of typical daily operations. These include opening the POS register and processing sales transactions, registering and assigning customers, handling returns and refunds, managing the cash register, and closing the POS register.
Create a POS
If no point of sale exists in the database, a set of POS cards is displayed on the Point of Sale Dashboard. Each card represents a business type. Click a card to create a POS with preconfigured settings tailored to that type. These settings can be adjusted later as needed.
To create additional POS or to create one from scratch, go to , click New, and type a name. Additionally, click Configurations > Settings to fully configure the point of sale.
Tip
Alternatively, go to and click + New Shop in the header.
Important
To optimize the POS app tab’s performance, disable the Memory Saver setting in Google Chrome.
Assign a dedicated cash payment method and a cash journal to each POS. This ensures that accounting entries are separated and traceable to specific points of sale.
See also
Access the POS settings
To access the general POS settings, go to . Then, open the Point of Sale dropdown menu and select the POS to configure.

Tip
To configure basic settings, go to , click the (vertical ellipsis) icon on the relevant POS card, then select Configure to perform the following actions:
Open the POS register
The POS register is divided into three sections: the product selector, the cart to visualize the products added to the order, and the numpad for order actions. Once the POS is fully configured, follow these steps to access the register:
Go to .
On the relevant POS card, click Open Register.
In the Opening Control popover, ensure the Opening cash amount is correct.
Click Open Register.
Note
Once the register is open, the Open Register button is replaced by the Continue Selling button on the Dashboard’s POS card.
It is possible to switch between multiple users from an open POS register, provided multi-employee management is enabled.
From the POS interface header:
Click Register to access the register for daily POS actions, such as sales, refunds, and more.
Click Orders to access the POS orders overview screen and retrieve past or ongoing orders.
Click the (plus) icon to put the current order aside and start a new one.
Click the order numbers to switch between ongoing orders.
Search for products using the search bar.
Click the (barcode) icon to use a webcam as a barcode scanner.
Click the user’s avatar to switch between employees, provided multi-employee management is enabled.
Click the (hamburger menu) icon to access more advanced options, as well as to close the register.
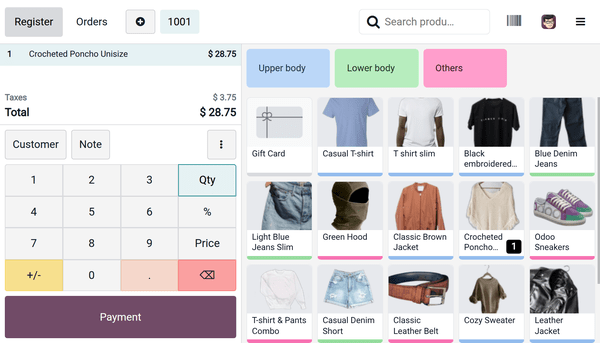
Sell products
To sell products in the POS register, follow these steps:
Click on products to add them to the cart.
To change the quantity, click Qty, then enter the number of products using the numpad.
To add a discount, click %, then enter the discount value using the numpad.
To modify the product price, click Price, then enter the new amount using the numpad.
Once the order is complete, click Payment to proceed to the payment screen.
Select the payment method, then enter the amount, if needed.
Click Validate.
Once payment is successful, the receipt can be printed or sent to the customer.
To move on to the next order, click New Order on the receipt screen.
Register and assign customers
Registering customers is necessary to collect their loyalty points and grant them rewards, automatically apply an attributed pricelist, or generate and print invoices.
To create customers from the POS register:
Click Customer.
Click Create.
Enter the customer’s details, then click Save.
To create customers from the backend:
Go to .
Click New.
Enter the customer’s details and save.
To assign a customer to an order in the POS register or on the payment screen, click Customer and select the desired customer. To select a different customer, click the current customer’s name on the numpad, then select another one.
Tip
To edit the customer’s details, click the customer’s name on the numpad, click the (hamburger menu) icon next to the relevant customer, then select Edit Details.
Note
Creating a new customer in the POS register or on the payment screen automatically assigns them to the current order upon saving.
Send marketing messages
Customers’ contact details, such as phone numbers or email addresses, are automatically stored when receipts are sent via email, SMS, or WhatsApp. They can then be used, for example, for marketing purposes.
To send marketing messages manually from the POS backend, follow these steps:
Go to .
Click a POS order and open the Extra Info tab.
Under the Contact Info category, click the (email) icon or the (WhatsApp) icon next to the completed Email or Mobile field.
Note
Make sure a customer is assigned to the order to send marketing messages manually.
See also
Access the orders overview
The orders overview allows for viewing, searching, and retrieving orders from the POS interface. To access it, click Orders in the POS interface header.
To filter orders based on their status, click the Active dropdown menu and select one of the following options:
Active: Orders currently in progress. This includes orders marked as Ongoing, as well as those in the Payment or the Receipt stages (i.e., orders for which the receipt has been emailed to the customer).
Paid: Paid orders.
Cancelled: Orders cancelled on online platforms through UrbanPiper.
It is also possible to search for orders based on, for example, the Receipt Number, Date, or Customer.
To navigate between pages, click the or (caret) icon.
To access an order in the register, click it, then click Load Order.
Note
Paid orders can be refunded.
Tip
To define the number of orders visible on a page, click
1-x / x. Enter a number lower than the total number of pages, and click Confirm.Click the (trash) icon next to an Active order to delete it.
If using presets, click one to view the related orders. Click it again to return to the main overview.
Return and refund products
The steps to process a refund from the POS register depend on whether the refund is based on an order or processed as a standalone refund that is not based on an order.
In both cases, the amount can be refunded or a gift card issued for the refunded amount.
Note
Once the return is validated, a corresponding credit note is generated, referencing the original receipt or invoice.
See also
Order-based refunds
To process a refund based on an order, follow these steps:
Click the (vertical ellipsis) icon in the POS register.
Select Refund. The orders overview opens, displaying all Paid orders.
Select the product(s) to refund, and then enter the quantity to refund if needed.
Click Refund to open the payment screen.
Choose how to handle the refund:
To refund the customer, on the payment screen, select a payment method, then click Validate.
To issue a gift card for the refund amount, on the payment screen, click Back. The cart displays the returned product(s) with a negative quantity. Then, add the gift card from the product selector to the order; its value is automatically set to match the total refund amount. Click Payment, then Validate the refund.
Tip
Alternatively, access the list of paid orders by clicking Orders in the POS interface header and selecting Paid from the Active dropdown menu.
Refunds can also be initiated and processed from the backend. To do so, go to , select an order, then click Return Products. Note that this method can only be used to refund the entire order.
Standalone refunds
To process a standalone refund that is not based on an order, follow these steps:
Select the relevant product from the POS register.
Click Qty to enter the quantity to refund, then click +/- to set it as a negative quantity.
Click Payment to open the payment screen.
Choose how to handle the refund:
To refund the customer, on the payment screen, select a payment method, then click Validate.
To issue a gift card for the refund amount, on the payment screen, click Back. The cart displays the returned product(s) with a negative quantity. Then, add the gift card from the product selector to the order; its value is automatically set to match the total refund amount. Click Payment, then Validate the refund.
Tip
To facilitate management of standalone returns, create a preset with only the Return mode enabled. When this preset is selected from the POS register, the quantity of any item added to the cart is set to negative.
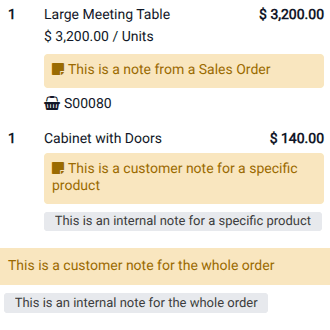
Add and manage notes
Notes allow for extra information to be added to specific products in an order. There are two types of notes: internal notes and customer notes.
Tip
If the same content is frequently used, configure a note model to save time. To create or edit note models, go to , click New or click the relevant note model, then complete or edit the Name column.
Note
Any customer notes added to a product from the POS register are displayed on the customer display.
Internal notes
Internal notes provide information intended for staff (e.g., no tomato for the kitchen team) and
do not appear on the customer’s receipt.
To add or edit an internal note from the POS register, follow these steps:
If the note applies to:
The entire order: Ensure no item is selected in the cart, then click Note.
A specific item: Select the item in the cart, then click Note.
Add or modify the note’s content in the popover or select a previously configured note model.
Click Apply.
Customer notes
Customer notes appear on receipts and invoices.
They can be used, for example, to provide warranty details for a high-value item or specific care
instructions, such as Dry clean only.
To add or edit a customer note from the POS register, follow these steps:
If the note applies to:
The entire order: Ensure no item is selected in the cart, click the (vertical ellipsis) icon, then click Customer Note.
A specific item: Select the item in the cart, click the (vertical ellipsis) icon, then click Customer Note.
Add or modify the note’s content in the popover or select a previously configured note model.
Click Apply.
Note
Product notes from imported sales orders are displayed in the same way as customer notes.
Manage the cash register
Odoo POS allows accepted coins and bills to be defined. To set up the allowed coins and bills:
Navigate to .
Click New to add a new value.
Select the POS where this value is accepted in the Point of Sales column, or leave the field empty to make it available for all POS.
To record a cash-in or cash-out transaction not associated with a sale from the POS register:
Click the (hamburger menu) icon on the POS interface.
Click Cash In/Out.
Select Cash In or Cash Out in the popover.
Enter the amount in the field with the currency symbol.
Specify the reason for the addition or removal of cash, and click Confirm.
Note
Only employees with basic or advanced access rights are allowed to perform cash-in/out actions.
Close the POS register
To close the POS register, click the (hamburger menu) icon, then Close Register.
The Closing Register popover displays:
The number of orders and the total amount made during the session.
The expected amounts grouped by payment method.
Click the (money) icon to specify the number of coins and bills, then click Confirm.
Click Close Register to close the register and post accounting entries.
Tip
Click the (clone) icon to automatically fill in the field with the expected cash amount.
Note
After specifying the number of coins and bills, the computed amount is set in the Cash Count field, and the Closing details are specified in the Closing note section.
Closing the register of a restaurant POS when orders are still in draft and not scheduled for later is not allowed and opens a popover with options to Review Orders or Cancel Orders.
It is strongly advised to close the POS register at the end of each day.
Set maximum difference
When the counted money does not match the expected amount, a Payments Difference window appears, prompting you to acknowledge the discrepancy. Click Proceed Anyway to accept the difference and post it to the designated cash difference journal.
To restrict this behavior, you can prevent users from closing the register when a discrepancy occurs by enabling the Set Maximum Difference setting in the Payment section of the POS settings. Then, specify the allowed limit in the Authorized Difference field.
Once configured, if a discrepancy exceeds this limit, the pop-up window displays the authorized threshold and instructs the user to contact a manager to approve the closing.
See also